What is primary and secondary DNS Zones?
What is a primary DNS server?
DNS, or the Domain Name System, translates domain names into IP addresses so users can easily navigate to sites on the Internet without having to memorize long, specific strings of numbers and letters.
In this system, a primary DNS server is a server that hosts a website’s primary zone file. This is a text database file that contains all of the authoritative information for a domain, including its IP address, the identity of the domain administrator, and various resource records. Resource records list domain names alongside their corresponding IP addresses, and can take several different forms:
A record: Directs a domain to an IPv4 address
AAAA record: Directs a domain to an IPv6 address
MX record: Assigns a mail server to a domain
NS record: Identifies authoritative DNS servers for a domain
Primary servers are also responsible for making any necessary changes to a zone’s DNS records. Once the primary server has completed the update, it can then pass along change requests to the secondary servers.
What is a secondary DNS server?
Primary DNS servers contain all relevant resource records and handle DNS queries for a domain. By contrast, secondary DNS servers contain zone file copies that are read-only, meaning they cannot be modified. Instead of getting their information from local files, they receive pertinent information from a primary server in a communication process known as a zone transfer.
Zone transfers become more complicated when they are completed between multiple secondary servers. If several secondary servers are in use, one may be designated as a higher-tier secondary server so that it is capable of replicating zone file copies to the remaining pool of secondary servers.
How is a primary DNS server configured?
A server administrator may choose to designate a DNS server as a primary or secondary server. In some cases, a server can be primary for one zone and secondary for another zone.
Although each zone is limited to one primary DNS server, it can have any number of secondary DNS servers. Maintaining one or more secondary servers ensures that queries can be resolved even if the primary server becomes unresponsive.
What are the benefits of using a secondary DNS server?
Although secondary DNS servers are not necessary to complete DNS queries for a domain, it is standard practice (and required by many registrars) to establish at least one.
There are two main benefits of using a secondary DNS server:
Redundancy and resiliency: Relying on just one DNS server creates a single point of failure. If the primary server fails or is compromised by an attack, prospective visitors can no longer access the desired domain. Using secondary servers creates redundancy and makes it less likely that users will experience a disruption of service.
Load balancing: Secondary DNS servers can share the burden of incoming requests to the domain so that the primary server doesn’t get overloaded and cause a denial-of-service. They do this using round-robin DNS, a load balancing technique designed to send roughly equal amounts of traffic to each server.
What is dynamic DNS?
Dynamic DNS (DDNS) is a service that keeps IP addresses automatically updated. This is especially useful for smaller web properties (personal websites, small businesses, etc.) that are not assigned static IPs, but instead temporarily lease IPs from their Internet Service Provider (ISP).
Rather than making frequent manual changes to a domain’s IP address via the primary server, users can employ DDNS to automatically update their DNS records with the most current IP address that has been assigned to their domain.
How to connect from powereshell to Azure Active Directory ?
In order to connect to manage users and organization settings in Office 365 via Powershell, you need to install the Azure Active Directory PowerShell Module. This can be simply installed via PowerShell itself.
This module allows you to perform a lot of the Office 365 user and organisation administration tasks via PowerShell. It’s great for bulk tasks like password resets, password policies, license management/reporting etc. If you’re a Microsoft Partner, and are managing your customers Office 365 tenants via delegated administration, this module gives you a secure way to perform admin tasks using your own credentials.
How to Install the Azure Active Directory PowerShell Module via PowerShell ?
- Open the Start menu on your computer and search for ‘Powershell’
- Right-click on Windows PowerShell and choose ‘Run as administrator’
- Type the following command and press enter.
Install-Module -Name MSOnline - Type “Y” to install and import the NuGet provider
- Type “Y” again to trust the provider
- Wait for the package to install, then type the following to enter your Office 365 admin credentials and connect to Azure Active Directory via PowerShell:
Connect-MsolService - Once the Azure Active Directory PowerShell module has been installed, you only need to run the Connect-MsolService command to connect to the Azure AD service on this PC.
How to migrate vmware virutal machine to Azure?
What does an SSL certificate do?
An SSL certificate (more accurately called a TLS certificate), is necessary for a website to have HTTPS encryption. An SSL certificate contains the website’s public key, the domain name it’s issued for, the issuing certificate authority’s digital signature, and other important information. It’s used for authenticating an origin server’s identity, which helps prevent on-path attacks, domain spoofing, and other methods attackers use to impersonate a website and trick users.
HTTPS creates an encrypted connection between a user’s browser and the web server they are communicating with, protecting the communications from being intercepted. SSL certificates are necessary for establishing this encrypted connection (see What is an SSL certificate? to learn more).
What are the different types of SSL certificates / How many types of SSL exists?
Single Domain SSL Certificates
A single-domain SSL certificate applies to one domain and one domain only. It cannot be used to authenticate any other domain, not even subdomains of the domain it is issued for.
All pages on this domain are also secured with the certificate; for instance, if cloudflare.com has a single-domain certificate, then cloudflare.com/learning (the Learning Center main page) is also covered by that certificate.
Wildcard SSL Certificates
Wildcard SSL certificates are for a single domain and all its subdomains. A subdomain is under the umbrella of the main domain. Usually subdomains will have an address that begins with something other than ‘www.’
For example, www.cloudflare.com has a number of subdomains, including blog.cloudflare.com, support.cloudflare.com, and developers.cloudflare.com. Each is a subdomain under the main cloudflare.com domain.
Wildcard SSL Certificate
A single Wildcard SSL certificate can apply to all of these subdomains. Any subdomain will be listed in the SSL certificate. Users can see a list of subdomains covered by a particular certificate by clicking on the padlock in the URL bar of their browser, then clicking on “Certificate” (in Chrome) to view the certificate’s details.
Multi-Domain SSL Certificates (MDC)
A multi-domain SSL certificate, or MDC, lists multiple distinct domains on one certificate. With an MDC, domains that are not subdomains of each other can share a certificate.
What are SSL certificate validation levels?
A bank doesn’t issue a loan to someone before performing a credit check. Similarly, before a certificate authority (CA) issues an SSL certificate to an organization, they have to validate the organization; it has to be proven that the organization actually owns and operates the domain. This is what’s known as SSL certificate validation.
However, there are different levels of validation, ranging from bare minimum validation to thorough background investigations. An SSL certificate from any of these validation levels provides the same degree of TLS encryption; the only difference is how thoroughly the CA has authenticated the organization’s identity.
Domain Validation SSL Certificates
Domain Validation is the least-stringent level of validation. To obtain one of these SSL certificates, an organization only has to prove they control the domain. They can do this by altering the DNS record associated with the domain, or sometimes just by sending the CA an email. Often the process is automated.
This level of validation is the cheapest. It’s a good option for blogs, portfolio sites, or for small businesses that are just looking to quickly launch HTTPS, especially if a business doesn’t sell products via its website (e.g. a restaurant or coffee shop).
Organization Validation SSL Certificates
Organization Validation involves a manual vetting process: The CA will contact the organization requesting the SSL certificate, and they may do some further investigating. Organization Validation SSL certificates will contain the organization’s name and address, making them more trustworthy for users than Domain Validation certificates.
Extended Validation SSL Certificates
Extended Validation involves a full background check of the organization. The CA will make sure that the organization exists and is legally registered as a business, that they actually are present at the address they list, and so on. This validation level takes the longest and costs the most, but Extended Validation SSL certificates are more trustworthy than other types of SSL certificates. Consequently, these certificates are necessary for a website’s address to turn the browser URL bar green, the visual representation for users of a trustworthy TLS-encrypted site.
Large enterprises, financial institutions, and eCommerce stores should obtain Extended Validation certificates. This is especially crucial if a site or application handles sensitive customer data, such as passwords, credit card numbers, or names and addresses.
What is SAN in SSL Certificate?
A Multi-Domain SSL certificate, also known as a UCC, Unified Communications certificate, or SAN certificate, is a type of certificate that uses Subject Alternative Names (SANs) to secure multiple host names. Any number of different domain names can be included in the SAN field of the certificate enabling the certificate to work on any of the included domain names. For example, you could get one Multi-Domain SSL Certificate to cover all of the following:
mydomain.com
mail.mydomain.com
autodiscover.mydomain.com
anotherdomain.com
This can provide significant cost savings in many situations. A Multi-Domain Certificate is also required for certain features in Microsoft’s Exchange Server, Office Communications Server, and Live Communications Server.
A Subject Alternate Name (or SAN) certificate is a digital security certificate which allows multiple hostnames to be protected by a single certificate.
A SAN certificate may also be called a Unified Communication Certificate (or UCC), a multi-domain certificate, or an Exchange certificate.
What is FSMO Roles?
Active Directory allows object creations, updates, and deletions to be committed to any authoritative domain controller. This is possible because every Active Directory domain controller maintains a writable copy of its own domain’s partition – except, of course, Read-Only Domain Controllers. After a change has been committed, it is replicated automatically to other domain controllers through a process called multi-master replication. This behavior allows most operations to be processed reliably by multiple domain controllers and provides for high levels of redundancy, availability, and accessibility within Active Directory.
An exception to this behavior applies to certain Active Directory operations that are sensitive enough that their execution is restricted to a specific domain controller. Active Directory addresses these situations through a special set of roles. Microsoft has begun referring to these roles as the Operation Masters roles, but they are more commonly referred to by their original name, Flexible Single-Master Operator (“FSMO”) roles.
Active Directory has five FSMO roles, two of which are enterprise-level (one per forest) and three of which are domain-level (one per domain). The enterprise-level FSMO roles are called the Schema Master and the Domain Naming Master. The domain-level FSMO roles are called the Primary Domain Controller Emulator, the Relative Identifier Master, and the Infrastructure Master.
The following commands can be used to identify FSMO role owners. Command Prompt:
netdom query fsmo /domain:geminigroup.co
In a new Active Directory forest, all five FSMO roles are assigned to the initial domain controller in the newly-created forest root domain.
When a new domain is added to an existing forest, only the three domain-level FSMO roles are assigned to the initial domain controller in the newly-created domain; the two enterprise-level FSMO roles already exist in the forest root domain.
FSMO roles often remain assigned to their original domain controllers, but they can be transferred if necessary.
What are the 5 FSMO Roles in Active directory ?
- Schema Master
- Domain Naming Master
- RID Master
- Infrastructure Master
- PDC Emulator
Schema Master
The Schema Master is an enterprise-level FSMO role; there is only one Schema Master in an Active Directory forest.
The Schema Master role owner is the only domain controller in an Active Directory forest that contains a writable schema partition. As a result, the domain controller that owns the Schema Master FSMO role must be available to modify its forest’s schema. This includes activities such as raising the functional level of the forest and upgrading the operating system of a domain controller to a higher version than currently exists in the forest, either of which will introduce updates to Active Directory schema.
The Schema Master role has little overhead and its loss can be expected to result in little to no immediate operational impact; unless schema changes are necessary, it can remain offline indefinitely without noticeable effect. The Schema Master role should only be seized when the domain controller that owns the role cannot be brought back online. Bringing the Schema Master role owner back online after the role has been seized from it may introduce serious data inconsistency and integrity issues into the forest.
Domain Naming Master
The Domain Naming Master is an enterprise-level role; there is only one Domain Naming Master in an Active Directory forest.
The Domain Naming Master role owner is the only domain controller in an Active Directory forest that is capable of adding new domains and application partitions to the forest. Its availability is also necessary to remove existing domains and application partitions from the forest.
The Domain Naming Master role has little overhead and its loss can be expected to result in little to no operational impact, as the addition and removal of domains and partitions are performed infrequently and are rarely time-critical operations. Consequently, the Domain Naming Master role should only need to be seized when the domain controller that owns the role cannot be brought back online.
RID Master
The Relative Identifier Master (“RID Master”) is a domain-level role; there is one RID Master in each domain in an Active Directory forest.
The RID Master role owner is responsible for allocating active and standby Relative Identifier (“RID”) pools to domain controllers in its domain. RID pools consist of a unique, contiguous range of RIDs. These RIDs are used during object creation to generate the new object’s unique Security Identifier (“SID”). The RID Master is also responsible for moving objects from one domain to another within a forest.
In mature domains, the overhead generated by the RID Master is negligible. As the PDC in a domain typically receives the most attention from administrators, leaving this role assigned to the domain PDC helps ensure reliable availability. It is also important to ensure that existing domain controllers and newly promoted domain controllers, especially those promoted in remote or staging sites, have network connectivity to the RID Master and are reliably able to obtain active and standby RID pools.
The loss of a domain’s RID Master will eventually lead to result in an inability to create new objects within the domain as the remaining domain controllers’ RID pools are depleted. While the unavailability of the domain controller that owns the RID Master role may appear as though it would cause significant operational disruption, the relatively low volume of object creation events in a mature environment tends to result in the impact of such an event being tolerable for a considerable length of time. Bringing a RID Master back online after having seized its role can potentially introduce duplicate RIDs into the domain. Consequently, this role should only be seized from a domain controller if the domain controller that owns the role cannot be brought back online.
Infrastructure Master
The Infrastructure Master is a domain-level role; there is one Infrastructure Master in each domain in an Active Directory forest.
The Infrastructure Master role owner is the domain controller in each domain that is responsible for managing phantom objects. Phantom objects are used to track and manage persistent references to deleted objects and link-valued attributes that refer to objects in another domain within the forest (e.g., a local-domain security group with a member user from another domain).
The Infrastructure Master may be placed on any domain controller in a domain unless the Active Directory forest includes domain controllers that are not global catalog hosts. In that case, the Infrastructure Master must be placed on a domain controller that is not a global catalog host.
The loss of the domain controller that owns the Infrastructure Master role is only likely to be noticeable to administrators and can be tolerated for an extended period. While its absence will result in the names of cross-domain object links failing to resolve correctly, the ability to utilize cross-domain group memberships will not be affected.
PDC Emulator
The Primary Domain Controller Emulator (“PDC Emulator” or “PDCE”) is a domain-level role; there is one PDCE in each domain in an Active Directory forest.
The PDCE role owner is responsible for several crucial operations:
Backward Compatibility. The PDCE mimics the single-master behavior of a Windows NT primary domain controller. To address backward compatibility concerns, the PDCE registers as the target domain controller for legacy applications that perform writable operations and certain administrative tools that are unaware of the multi-master behavior of Active Directory domain controllers.
Time Synchronization. Each PDCE serves as the master time source within its domain. The PDCE in forest root domain serves as the preferred Network Time Protocol (“NTP”) server in the forest. The PDCE in every other domain within the forest synchronizes its clock to the forest root PDCE, non-PDCE domain controllers synchronize their clocks to their domain’s PDCE, and domain-joined hosts synchronize their clocks to their preferred domain controller.
Password Update Processing. When computer and user passwords are changed or reset by a non-PDCE domain controller, the committed update is immediately replicated to the domain’s PDCE. If an account attempts to authenticate against a domain controller that has not yet received a recent password change through scheduled replication, the request is passed through to the domain PDCE. The PDCE will attempt to process the authentication request and instruct the requesting domain controller to either accept or reject the authentication request. This behavior ensures that passwords can reliably be processed even if recent changes have not fully-propagated through scheduled replication. The PDCE is also responsible for processing account lockouts, as all failed password authentications are passed through to the PDCE.
Group Policy Updates. All Group Policy Object (“GPO”) updates are committed to the domain PDCE. This prevents the potential for versioning conflicts that could occur if a GPO was modified on two domain controllers at approximately the same time.
Distributed File System. By default, Distributed File System (“DFS”) root servers will periodically request updated DFS namespace information from the PDCE. While this behavior can lead to resource bottle-necking, enabling the Dfsutil.exe Root Scalability parameter will allow DFS root servers to request updates from the closest domain controller.
As a consequence of its responsibilities, the PDCE should be placed on a highly-accessible, well-connected, high-performance domain controller. Additionally, the forest root domain PDC Emulator should be configured with a reliable external time source.
While the loss of the domain controller that owns the PDC Emulator role can be expected to have an immediate and significant impact on operations, the nature of its responsibilities results in the seizure of the PDCE role having fewer implications to the domain than the seizure of other roles. The seizure of the PDCE role is considered a recommended best practice in the event a domain controller that owns the PDCE role becomes unavailable as a result of an unscheduled outage.
How Transferring FSMO Roles ?
FSMO roles are necessary to perform certain important operations and they are not redundant. As a result, it can be either desirable or necessary to move FSMO roles from one domain controller to another.
One method of transferring FSMO roles is to demote the domain controller that owns the roles. When a domain controller is demoted it will attempt to transfer any FSMO roles it owns to suitable domain controllers in the same site. Domain-level roles can only be transferred to domain controllers in the same domain, but enterprise-level roles can be transferred to any suitable domain controller in the forest. While there are rules that govern how the domain controller being demoted will decide where to transfer its FSMO roles, there is no way to directly control where its FSMO roles will be transferred.
The ideal method of moving an FSMO role is to actively transfer them using either the Management Console, PowerShell, or ntdsutil.exe. During a manual transfer, the source domain controller will synchronize with the target domain controller before transferring the role.
The account performing a Schema Master role must be a member of the Schema Admins and Enterprise Admins group. Membership in the Enterprise Admins group is necessary to transfer the Domain Naming Master role. The PDCE, RID Master and Infrastructure Master roles can be transferred by an account with membership in the Domain Admins group of the domain where the roles are being transferred.
Management Console
Transferring FSMO roles using the Management Console can require the use of up to three different snap-in modules.
Transferring the Schema Master Role
The Schema Master role can be transferred using the Active Directory Schema Management snap-in.
If the is not among the available Management Console snap-ins, it will need to be registered. To register the Active Directory Schema Management Console, open an elevated command prompt, type regsvr32 schmmgmt.dll, and press Enter:
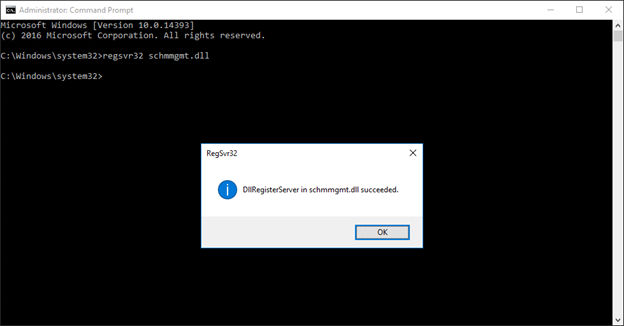
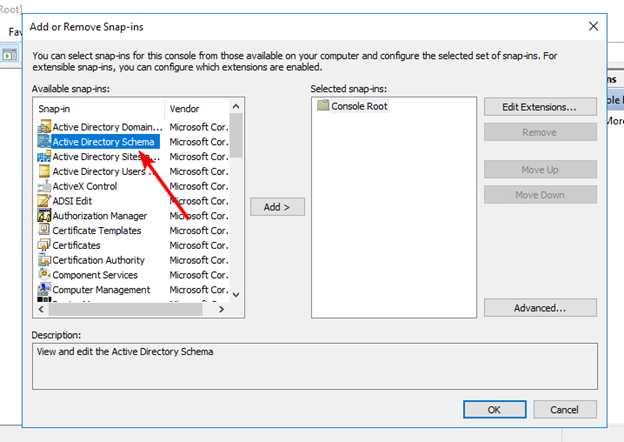
Once the DLL has been registered, run the Management Console as a user who is a member of the Schema Admins group and add the Active Directory Schema snap-in to the Management Console:
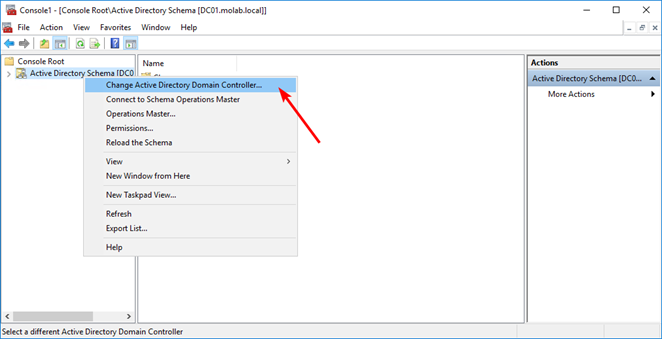
Right-click the Active Directory Schema node and select “Change Active Directory Domain Controller”. Choose the domain controller that the Schema Master FSMO role will be transferred to and click the “OK” button to bind the Active Directory Schema snap-in to the target domain controller (a warning may appear explaining that the snap-in will not be able to make changes to the schema because it is not connected to the Schema Master):
Right-click the Active Directory Schema node again and select “Operations Master”:
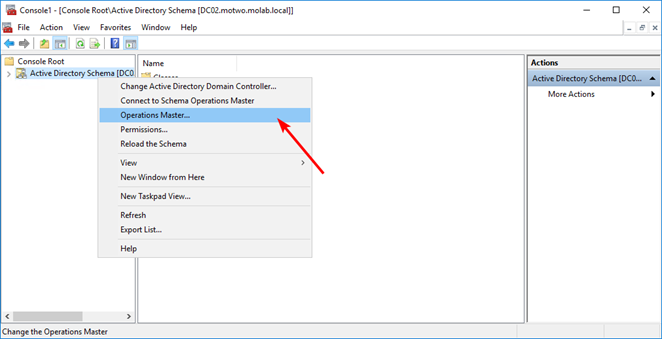
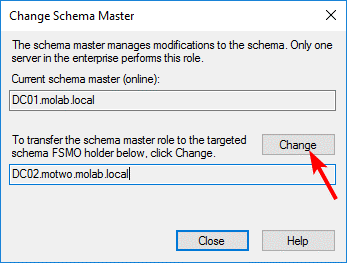
Click the “Change” button to begin the transfer of the Schema Master role to the targeted domain controller:
Transferring the Domain Naming Master Role
The Domain Naming Master role can be transferred using the Active Directory Domains and Trusts Management Console snap-in.
Run the Management Console as a user who is a member of the Enterprise Admins group and add the Active Directory Domains and Trusts snap-in to the Management Console:
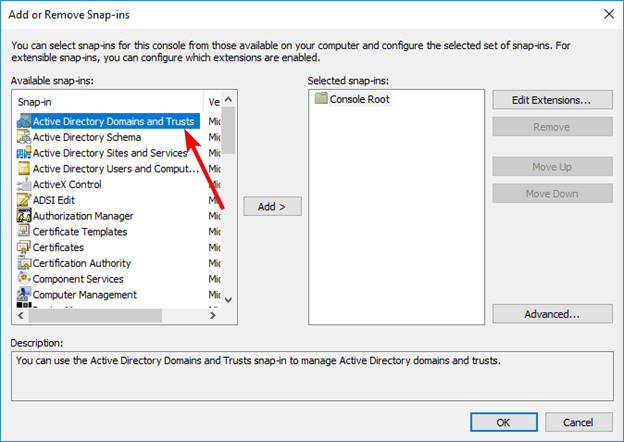
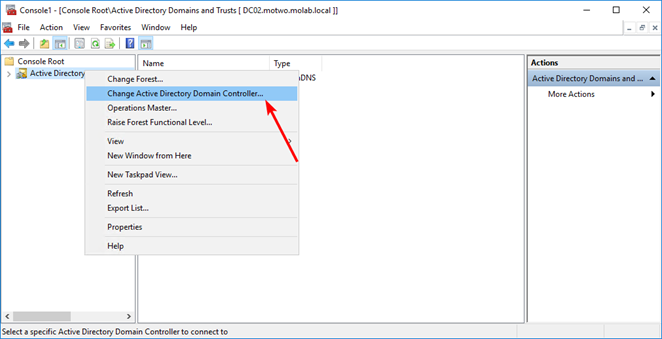
Right-click the Active Directory Domains and Trusts node and select “Change Active Directory Domain Controller”. Choose the domain controller that the Domain Naming Master FSMO role will be transferred to and click the “OK” button to bind the Active Directory Domains and Trusts snap-in to the target domain controller:
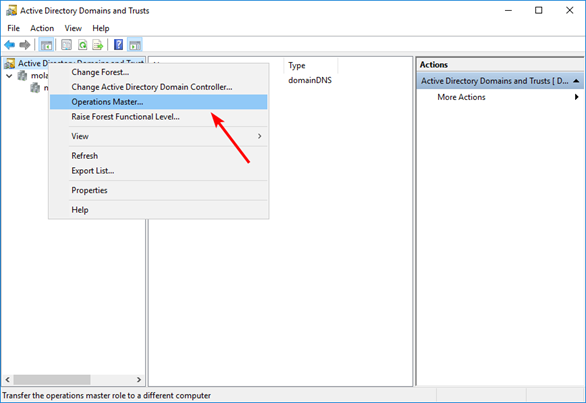
Right-click the Active Directory Domains and Trusts node again and select “Operations Master”:
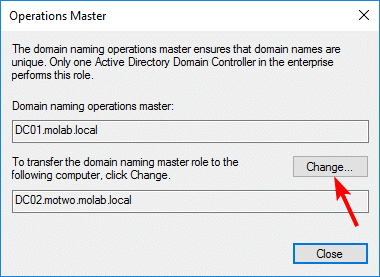
Click the “Change” button to begin the transfer of the Domain Naming Master role to the targeted domain controller:
Transferring the RID Master, Infrastructure Master, or PDC Emulator Roles
The RID Master, Infrastructure Master, and PDC Emulator roles can all be transferred using the Active Directory Users and Computers Management Console snap-in.
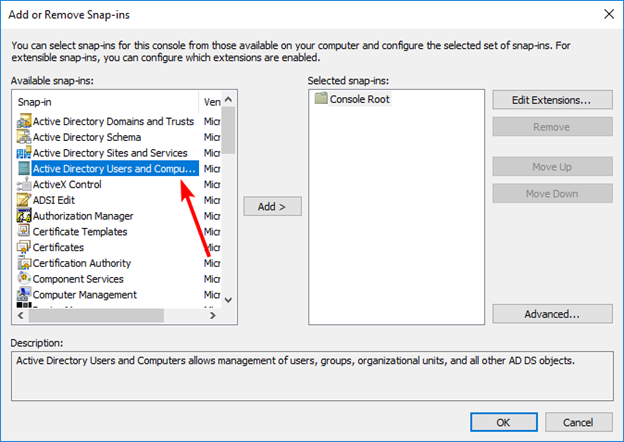
Run the Management Console as a user who is a member of the Domain Admins group in the domain where the FSMO roles are being transferred and add the Active Directory Users and Computers snap-in to the Management Console:
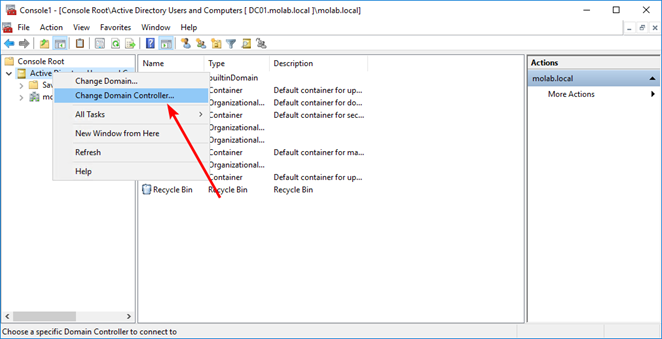
Right-click either the Domain node or the Active Directory Users and Computers node and select “Change Active Directory Domain Controller”. Choose the domain controller that the FSMO role will be transferred to and click the “OK” button to bind the Active Directory Users and Computers snap-in to the target domain controller:
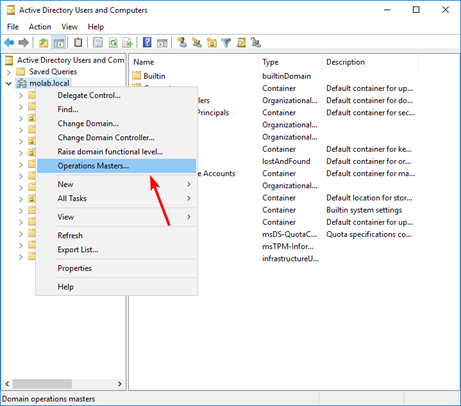
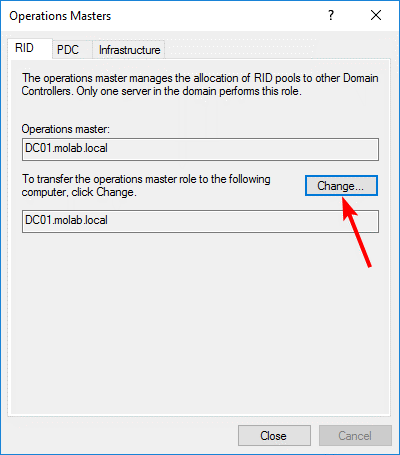
Right-click the Active Directory Users and Computers node and click “Operations Masters”:
Select the appropriate tab and click the “Change” button to begin the transfer of the FSMO role to the targeted domain controller:
ntdsutil.exe
ndtsutil.exe is a lightweight command-line tool that can perform a number of useful functions, including the transfer of FSMO roles.
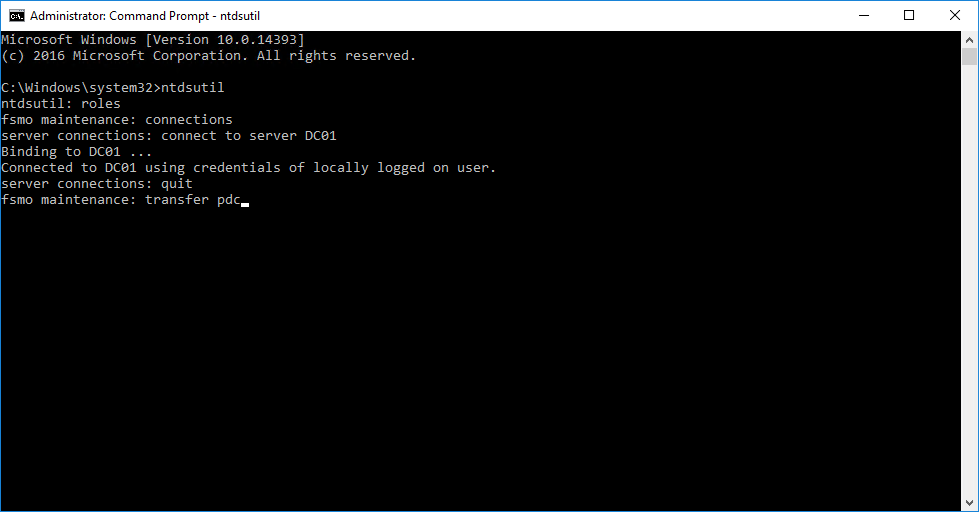
FSMO roles can be transferred using the following steps:
- Open an elevated command prompt.
- Type ntdsutil and press Enter. A new window will open.
- At the ntdsutil prompt, type roles and press Enter.
- At the fsmo maintenance prompt, type connections and press Enter.
- At the server connections prompt, type connect to server <DC> (replacing <DC> with the hostname of domain controller that the FSMO roles are being transferred to) and press Enter. This will bind ntdsutil to the target domain controller.
- Type quit and press Enter.
- At the fsmo maintenance prompt, enter the appropriate commands for each FSMO role being transferred:
- To transfer the Schema Master FSMO role, type transfer schema master and press Enter.
- To transfer the Domain Naming Master FSMO role, type transfer naming master and press Enter.
- To transfer the RID Master FSMO role, type transfer rid master and press Enter.
- To transfer the Infrastructure Master FSMO role, type transfer infrastructure master and press Enter.
- To transfer the PDC Emulator FSMO role, type transfer pdc and press Enter.
- To exit the fsmo maintenance prompt, type quit and press Enter.
To exit the ntdsutil prompt, type quit and press Enter
Seizing FSMO Roles
Transferring FSMO roles requires that both the source domain controller and the target domain controllers be online and functional. If a domain controller that owns one or more FSMO roles is lost or will be unavailable for a significant period, its FSMO roles can be “seized” to another domain controller.
In most cases, FSMO roles should only be seized if the original FSMO role owner cannot be brought back into the environment. The reintroduction of a FSMO role owner following the seizure of its roles can cause significant damage to the domain or the forest. This is especially true of the Schema Master and RID Master roles.
The Move-ADDirectoryServerOperationMasterRole cmdlet allows the use of a -Force parameter that can be used to seize FSMO roles. Using the -Force parameter will direct the cmdlet to attempt an FSMO role transfer and then to seize the roles if the transfer attempt fails.
The following instructions can be used to seize FSMO roles with the ntdsutil.exe utility:
- Open an elevated command prompt.
- Type ntdsutil and press Enter. A new window will open.
- At the ntdsutil prompt, type roles and press Enter.
- At the fsmo maintenance prompt, type connections and press Enter.
- At the server connections prompt, type connect to server <DC> (replacing <DC> with the hostname of domain controller that the FSMO roles are being seized to) and press Enter. This will bind ntdsutil to the target domain controller.
- Type quit and press Enter.
- At the fsmo maintenance prompt, enter the appropriate commands for each FSMO role being transferred:
- To transfer the Schema Master FSMO role, type seize schema master and press Enter.
- To transfer the Domain Naming Master FSMO role, type seize naming master and press Enter.
- To transfer the RID Master FSMO role, type seize rid master and press Enter.
- To transfer the Infrastructure Master FSMO role, type seize infrastructure master and press Enter.
- To transfer the PDC Emulator FSMO role, type seize pdc and press Enter.
- To exit the fsmo maintenance prompt, type quit and press Enter.
To exit the ntdsutil prompt, type quit and press Enter.
What is MX, CNAME, Host A records?
DNS MX Records
A DNS ‘mail exchange’ (MX) record directs email to a mail server. The MX record indicates how email messages should be routed in accordance with the Simple Mail Transfer Protocol (SMTP, the standard protocol for all email). Like CNAME records, an MX record must always point to another domain.
| example.com | record type: | priority: | value: | TTL |
|---|---|---|---|---|
| @ | MX | 10 | mailhost1.example.com | 45000 |
| @ | MX | 20 | mailhost2.example.com | 45000 |
The ‘priority’ numbers before the domains for these MX records indicate preference; the lower ‘priority’ value is preferred. The server will always try mailhost1 first because 10 is lower than 20. In the result of a message send failure, the server will default to mailhost2.
The email service could also configure this MX record so that both servers have equal priority and receive an equal amount of mail
What is the process of querying an MX record?
Message transfer agent (MTA) software is responsible for querying MX records. When a user sends an email, the MTA sends a DNS query to identify the mail servers for the email recipients. The MTA establishes an SMTP connection with those mail servers, starting with the prioritized domains (in the first example above, mailhost1).
What is a backup MX record?
A backup MX record is just an MX record for a mail server with a higher ‘priority’ value (which means a lower priority), so that under normal circumstances mail will go to the more prioritized servers. In the first example above, mailhost2 would be the ‘backup’ server because email traffic will be handled by mailhost1 as long as it is up and running.
Can MX records point to a CNAME?
A CNAME record is used for referencing a domain’s alias instead of its actual name. CNAME records typically point to an A record (in IPv4) or AAAA record (in IPv6) for that domain. However, MX records have to point directly to a server’s A record or AAAA record. Pointing to a CNAME is forbidden by the RFC documents that define how MX records function.
What is a DNS CNAME record?
The ‘canonical name’ (CNAME) record is used in lieu of an A record, when a domain or subdomain is an alias of another domain. All CNAME records must point to a domain, never to an IP address. Imagine a scavenger hunt where each clue points to another clue, and the final clue points to the treasure. A domain with a CNAME record is like a clue that can point you to another clue (another domain with a CNAME record) or to the treasure (a domain with an A record).
For example, suppose blog.example.com has a CNAME record with a value of ‘example.com’ (without the ‘blog’). This means when a DNS server hits the DNS records for blog.example.com, it actually triggers another DNS lookup to example.com, returning example.com’s IP address via its A record. In this case we would say that example.com is the canonical name (or true name) of blog.example.com.
Oftentimes, when sites have subdomains such as blog.example.com or shop.example.com, those subdomains will have CNAME records that point to a root domain (example.com). This way if the IP address of the host changes, only the DNS A record for the root domain needs to be updated and all the CNAME records will follow along with whatever changes are made to the root.
A frequent misconception is that a CNAME record must always resolve to the same website as the domain it points to, but this is not the case. The CNAME record only points the client to the same IP address as the root domain. Once the client hits that IP address, the web server will still handle the URL accordingly. So for instance, blog.example.com might have a CNAME that points to example.com, directing the client to example.com’s IP address. But when the client actually connects to that IP address, the web server will look at the URL, see that it is blog.example.com, and deliver the blog page rather than the home page.
Example of a CNAME record:
| blog.example.com | record type: | value: | TTL |
|---|---|---|---|
| @ | CNAME | is an alias of example.com | 32600 |
In this example you can see that blog.example.com points to example.com, and assuming it is based on our example A record we know that it will eventually resolve to the IP address 192.0.2.1.
Can a CNAME record point to another CNAME record?
Pointing a CNAME record to another CNAME record is inefficient because it requires multiple DNS lookups before the domain can be loaded — which slows down the user experience — but it is possible. For example, blog.example.com could have a CNAME record that pointed to www.example.com’s CNAME record, which then pointed to example.com’s A record.
CNAME for blog.example.com:
| blog.example.com | record type: | value: | TTL |
|---|---|---|---|
| @ | CNAME | is an alias of www.example.com | 32600 |
Which points to a CNAME for www.example.com:
| www.example.com | record type: | value: | TTL |
|---|---|---|---|
| @ | CNAME | is an alias of example.com | 32600 |
This configuration adds an extra step to the DNS lookup process and should be avoided if possible. Instead, the CNAME records for both blog.example.com and www.example.com should point directly to example.com.
What restrictions are there on using CNAME records?
MX and NS records cannot point to a CNAME record; they have to point to an A record (for IPv4) or an AAAA record (for IPv6). An MX record is a mail exchange record that directs email to a mail server. An NS record is a ‘name server’ record and indicates which DNS server is authoritative for that domain.
What is a DNS A record?
The ‘A’ stands for ‘address’ and this is the most fundamental type of DNS record: it indicates the IP address of a given domain. For example, if you pull the DNS records of cloudflare.com, the A record currently returns an IP address of: 104.17.210.9.
A records only hold IPv4 addresses. If a website has an IPv6 address, it will instead use an ‘AAAA’ record.
Here is an example of an A record:
| example.com | record type: | value: | TTL |
|---|---|---|---|
| @ | A | 192.0.2.1 | 14400 |
The ‘@’ symbol in this example indicates that this is a record for the root domain, and the ‘14400’ value is the TTL (time to live), listed in seconds. The default TTL for A records is 14400 seconds. This means that if an A record gets updated, it takes 240 minutes (14400 seconds) to take effect.
The vast majority of websites only have one A record, but it is possible to have several. Some higher profile websites will have several different A records as part of a technique called round robin load balancing, which can distribute request traffic to one of several IP addresses, each hosting identical content.
When are DNS A records used?
The most common usage of A records is IP address lookups: matching a domain name (like ‘cloudflare.com’) to an IPv4 address. This enables a user’s device to connect with and load a website, without the user memorizing and typing in the actual IP address. The user’s web browser automatically carries this out by sending a query to a DNS resolver.
DNS A records are also used for operating a Domain Name System-based Blackhole List (DNSBL). DNSBLs can help mail servers identify and block email messages from known spammer domains.